Thursday, 29 March 2012

Nude with Minty Polka Dots

With all the beautiful soft pastels popping up for Spring and Summer, I couldn't resist trying something out on my nails. Plus, I just got a package of dotting tools in the mail and I was so excited to try them out!
I found them on eBay, and there were very reasonably priced. (See, fun nail art can be totally affordable, folks!) Five of them came in the package and they are made of plastic and have metal tips on both ends. One side of the tools all have the same size of metal tip and the other ends have 5 varying sizes of metal tips. They seem like they will be very versatile for different sized dots - I can't wait to experiment!


The tools actually seem quite robust considering their price, so I am curious to see how long they last. I'm keeping it pretty simple with this manicure, but I love the delicateness of the line of dots. I used Essie's Sand Tropez and Turquoise and Caicos.


Such a sweet colour combination - so perfect for Spring!


Pin It

Wednesday, 21 March 2012

Manis & Martinis

We love being part of parties and events - adore it! So, when Anna asked us to participate in her manicure and martini birthday party, we were thrilled! The ladies had such fun manicure requests and the energy in the air was fantastic. It was great to be part of their preparations for a night out on the town. Martinis, manicures, and then dancing...who could ask for a better birthday party? Check out the manicures we did!

This one is awesome - gold nails with black French tips and a sugar skull accent nail. Cool!

Peach with gold diagonals and a hot pink kiss accent! So cute.

The birthday girl opted for the tuxedo mani to match her birthday dress! Adorable.

The sparkly blizzard mani...there was still snow then!

Fairy nails...love the combination of the dark base with the multicoloured glitter!

And, last but not least, tiger stripes on gold! So neat.

And here are all the gorgeous ladies showing off their nailart and ready to hit the town! 

Such a fun night!


Pin It

Monday, 19 March 2012

Partnership with Ef Magazine


We are thrilled to announce that we will be writing regular posts for Ef Magazine. Ef is all about sustainable fashion which means our posts will be about eco-friendly nail care! Be sure to check in regularly to read reviews on non-toxic polishes and nail care products and hear the latest from the eco-friendly nail world!

Our first post just went up this morning and is all about a little background research we did about non-toxic nail care. Check it out! We will keep you updated :)

- Emilie & Kristina Pin It

Friday, 16 March 2012

Flip Flop Fantasy

When asked what our favourite polish is, we have a few that have always been in our top 5. Flip Flop Fantasy is one of them and has been for a while. So, I thought it was about time I share it's awesomeness with you.

Flip Flop Fantasy (let's nickname it FFF) is made by China Glaze and, in Canada, can easily be found at Sally Beauty Supply. Basically, it is one of the best neon polishes we have ever seen. It is a perfect harmony between neon pink and neon orange, creating the most perfect neon coral! It is simply stunning on your fingertips - seriously, people have stopped me on the street and asked me what polish I was wearing. FFF is not for the faint of heart, it absolutely jumps out at you and is not a polish that blends in. It actually glows...I'm not kidding.

I really wanted to show you how it actually appears on the nails, but, unfortunately, neons are notoriously difficult to photograph. I did my best!


Indirect sunlight (indoors)

Shade (outdoors)

Shadow (outdoors)

Direct sunlight ...looks crazy here!

No flash or sunlight (indoors)

Wow! See what I mean? I would say that the photo captioned Shadow (outdoors) is the closest to how it actually shows up on the nails. So, if you are considering investing in a neon, or you already have some but want to amp it up, go pick up FFF! In fact, it is one of the few polish bottles I have that I have almost emptied completely.


It also looks awesome as a pedicure, above are my toes (and my sister and Mother) and will absolutely enhance any tan you've got going on. Stock up for summer, ladies!

Pin It

Wednesday, 7 March 2012

Thigh High Stockings Nails

I love taking manicures to the next level by adding cool details on the tips. With the popularity of the Lana Del Rey manicure, I have definitely fallen in love with keeping my nails pretty simple except for some special design on the tip. It's all about taking the classic French manicure (yawn) and shaking it up with a modern and feminine twist. These two manicures remind me of thigh high stockings, so that's what I've chosen for the name. Plus, who wouldn't want to sport the spicy playfulness of thigh high stockings on their fingertips? Count me in!

The first variation of this manicure is in black, with a line of black polka dots.
For this manicure, I used Essie's Sand Tropez and Deborah Lippmann's Fade to Black. 


The other version I came up with is red with scalloping - which creates a lace-y look.

For this varation, I used Deborah Lippmann's Naked and China Glaze's China Red.


Ooh la la! 

Pin It

Saturday, 3 March 2012

Glitter Nail Polish Removal

We love glitter of all types - but we especially love glitter of the nail polish variety. Glitter nail polish is awesome and always looks wicked. But, and there is a but, it is sooo annoying to take off. In my experience, removing glitter polish has always been a long affair that usually results in hand cramps. So, after experimenting with Candy Shop, I decided to try the tinfoil method. It rules! Check it out.

All you need is: 
1. Nail polish remover
2. Cotton pads
3. Tin foil, cut into squares

STEP ONE: Soak pad in remover and place on the nail (I folded it for double layer action)

 STEP TWO: Wrap nail in foil 

STEP THREE: Wrap foil tightly around your finger tip, making sure it is secure and won't fall off

STEP FOUR: Repeat steps on all nails

STEP FIVE: Let sit for 10 minutes or so. Pose with robot-alien fingers (optional)

 STEP SIX: Push down/pinch finger tip and pull off while applying pressure.

Look - it almost all came off! (and this is THREE coats of Deborah Lippmann glitter, people). Then, I just removed the leftover glitter the regular way. I am very pleased with the results of this method - 100% easier than the traditional rubbing, and rubbing, and rubbing, and rubbing-until-I-want-to-cry-way. I recommend it!

Fear removing glitter no more!

Pin It

Candy Shop Review


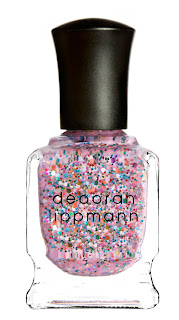
I wanted to experiment a little with Deborah Lippmann's Candy Shop because it is just too adorable and is also absolutely perfect to brighten up these dreary winter days. Plus, it's an extremely eye-catching and outrageous manicure that only requires one step!

The sheer base of this polish is a warm, bright bubblegum pink and gets darker and more vibrant as coats are layered. The actual glitter in this polish is multicoloured (silver, green, light blue, dark blue, red, orange, purple, and gold) and made up of tiny round flecks and larger hexagonal flecks. It definitely reminds me of a bag of bulk candy from a candy shop - so sweet!

One coat:
 Two coats:
 Three coats:
Daylight:

I love the way this polish looks on its own but was also curious to see how it would look on different base colours. These are the colours I tried out:

 One coat of Candy Shop on top:
 Two coats:
Daylight:

Love it! I really like how it turned out on the neon pink base. Now, as much as we looove glitter polishes, we do not love the daunting task of removing them. So, stay tuned for a post on an easy way to take off glitter manicures!

Pin It