Showing posts with label Essie Licorice. Show all posts

Sunday, 8 January 2012

Jessie J Black and Gold Manicure

As promised, here is the other manicure that I spotted in Jessie J's music video for Domino. Did you spot it? Here are some screen shots:


I really like this one. It's pretty fierce and I love how she pairs it with that bedazzled hat. Awesome! For my version of this manicure, I started with two coats of Essie's Licorice (my go-to black). For the gold accents, I picked up one of Sally Hansen's Hard as Nails Xtreme Wear nail colour in Golden-I. It's a little bit more silvery gold as opposed to Jessie J's yellow gold, but I didn't have my YSL Gold that I used here

After letting two coats of black and one coat of Seche Vite dry for about 20 minutes, I used Scotch tape to section of a thin line in the middle of the nail.
Then, after making sure there were no bubbles along the tape line on each nail, I carefully painted one coat of gold over the uncovered areas.

One word of caution - wait as long as possible to let your coats of base colour and Seche Vite dry before doing the tape step. For this manicure, even though the tape didn't pull up any black, the tape left tiny, and almost unnoticeable, ridges and valleys in the black as it was still slightly sticky under the Seche Vite.

I decided to add gold polka dots with my dotting tool (found in the painting/sculpting section of your local craft store - a toothpick would also work) instead of adding 3D decals like Jessie J's. I love the look of decals but would rather not have them all over my nails. It would be so devastating if one caught on something and ripped off - taking some of the manicure with it! Then I added one coat of Seche Vite to lock it in and, fortunately, this final coat of polish eliminated the appearance of those minuscule ridges and valleys mentioned earlier. This is what it ended up looking like:


I didn't realize until after I got started that these nails are probably supposed to be dominos (duh) but, either way, they are cute and I see a lot of variations of this manicure in Beauty School Dropouts' future!
Pin It

Saturday, 31 December 2011

NYE Sparkle in the Midnight Air

I finally decided on a manicure for tonight! Since I haven't settled on an outfit yet (I know...cutting it close), I opted for a manicure that could go with pretty much anything.
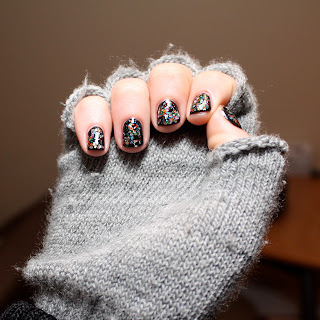
I used two coats of Essie's Licorice (black) as the base and added Deborah Lippmann's I Love the Nightlife as a gradient concentrated at the tips.
As expected, Lippmann did it again - created an awesome glitter. The chunks of glitter themselves are octagonal in shape and are silver with a slight blueish-purpleish tint. The glitter is in a clear base which makes it easy to apply to any base colour. I love the shape and size of these glitter pieces because, even though they are pretty glamorous and intense, the fact that they are slightly biggers makes them pretty adorable because they kindof look like polka dots on the nails.
Overall, a great glitter that helped create a black and silver manicure that will (hopefully) match whatever I end up wearing tonight.

Whether you decide to go out all night or opt for a quiet night in, have an amazing NYE and Happy New Year! Pin It

Sunday, 4 December 2011

Weekend of Manicures

Leopard print definitely took over me for some reason this weekend. I know that we are technically in the holiday season but I guess I am just trying to squeeze in some crazy non-holiday party nails before its too late. I will, without a doubt, commit to some holiday manicures this week.

On Friday I was drawn to one of my favourite colours, China Glaze's Secret Periwinkle.
I decided to do leopard with a neutral background so, of course, I used my go-to greige; Deborah Lippmann's Waking up in Vegas.
For the black accents on the leopard print, I used the handy Sally Hansen nail pen. These pens are great for dotting when you aren't aiming for a flawless dot - absolutely perfect for leopard print.
This is how it turned out:
Friday night, my friends Tess and Callie asked if I had time to pop over and do some manicures and, of course, I can never turn down a manicure. Tess opted for a simple but eye-catching mani. We went for a simple base of Essie's Licorice to really showcase the glitter topcoat - Deborah Lippmann's Happy Birthday.

Described as a "party in a bottle," this glitter is truly one of the most special I have ever seen. It just becomes more awesome with every coat - something you definitely have to try for yourself. You won't be able to keep your eyes off your nails!
This is how Tess' nails ended up:
Callie spotted (pun intended) my leopard print nails and customized the colours for herself. She replaced the periwinkle with an adorable peach that Kristina got me in Scotland! It's made by Nail Paints by Barry M and is called Peach Melba.
This is how Callie's turned out - such a lovely colour combination!
Friday night was really chilly but these manicures definitely gave Tess and Callie a reason to brave the elements. If you got it, flaunt it!

On Saturday, I decided to wear this adorable light pink blouse decorated with pearls from Forever 21 and couldn't help crafting a semi-matching manicure. For the base, I used an ah-mah-zing pink by OPI called Mod About You. It's the perfect light, chalky, opaque pink. I love it.
On some of the nails, I did a hot pink leopard with Nina Ultra Pro's Punki Pink. This pink is a serious bright neon - really eye catching and super glowy.

On the rest of the nails, I used this great chunky glitter called Disco Ball that was also from Forever 21.
I definitely see this one being a part of some holiday manicures...
This is how it turned out:

This is definitely a party girl manicure. See what I said about leopard print taking over my weekend? It's just too much fun!

Next up - holiday manicures! Pin It

Sunday, 30 October 2011

Graveyard Hallowe'en Nails

Tonight is the 3rd night of Halloween parties so I decided to switch up my spooky manicure!
Once again, I used Deborah Lippmann as the background colour for 3 of the nails and the tombstone on the ring finger. For the neon orange thumb, I used a bright orange by Colour Club (it doesn't seem to have a name). I picked it up in a pack of brights at Winners (great find!).
Then, I used Essie's Licorice and a tiny paint brush to paint the graveyard silhouettes and the skeleton hand on the thumb.


Lastly, I added a couple strokes of grass to the tombstone with OPI's Jade is the New Black.

And it's complete! Off to another Hallowe'en party....mwah ha ha!

Pin It